EasyMerchant has created a handy step-by-step guide to installing plastic soakaway crates, along with a video demonstration.
Plastic soakaway crates offer around a 95% void ratio (depending on the type purchased). This means that installing this system is roughly 12x more efficient than the old fashioned way of creating a soakaway, which would be to fill a hole with pebbles.
In times gone by, soakaways were made of large pits chock-full of gravel, stone, and hardcore. The issue with this arrangement was that after some time, bits of soil were unavoidably washed down into the openings between the coarse stones, filling the empty spaces and making the soakaway ineffective.
By using modular attenuation cells instead, you’ll be able to achieve the same or better performance while being able to dig a much smaller hole.
With water management an ever-increasing factor for local authorities, developers, and homeowners, soakaway crates are now an everyday item found in almost all types of construction projects.
Without a soakaway or other similar drainage provisions, your property might experience problems with flash flooding all through periods of heavy rain.
What is a soakaway crate?
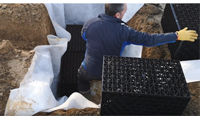
The Soakaway Crate, or at times referred to as a soakaway drainage crate, water block or aquablock, is a handy product in that it effectively replaces the debris infill in the soakaway pit. They resemble large milk crates but with a little more constructive stability and are bought in a flat pack form that you can fix together to form a box shape.
Soakaway crates are obtainable in two different colors, which in most cases signify where they can be used. The green plastic soakaway crates are not built to withstand the weight of an automobile and are therefore used in non-traffic areas. The blue ones, on the other hand, can be used in traffic areas since they can withstand the weight of an automobile.
When should you use a soakaway system?
Soakaway crates are more often than not used in areas where the ground is covered by impervious materials like tarmac, paving blocks, and concrete, ie; roads, car parks and large roofed areas. The installation of local rainwater infiltration systems is often a legal requirement on such construction projects.
To ensure that soakaways work efficiently, they should be put in loamy or sandy soil. We don’t recommend installing soakaways in clay soil, as clay doesn’t allow water to drain through it. You’ll need to perform a “Percolation Test” to determine if the soil is able to drain quickly enough to be able to install a soakaway.
The perfect spot is in the ground at a lower level than that of the building, or at least on the same level. You should also make sure that the spot is at least five meters away from the building to avoid any structural damage.
Step 1 – Create space
Dig a hole that is the right size for the crates and the top, side and base fillers of gravel and sand. The required dimensions can be obtained from the place you buy the crates.
Step 2 – Prepare the crates
You should recieve some clips or ties with the crates. These are used to hook up the crates to prevent movement while the side-filling materials are added.
Always cover the soakaway crates with a geotextile membrane to maintain the performance of the system.
Step 3 – Prepare the base
A layer of sharp sand or pea gravel should be put into place before the crates are lowered in, then the geotextile membrane should be fitted inside the hole, ready for the soakaway crates to sit on top of.
Step 4 – Hook up to the drainage system
Some soakaway crates have a separate section in place for the stormwater pipe to be connected. If not, it can be placed next to the crates and held in place by the side fill.
Step 5 – Cover the crates
To secure the crates, remember to add side and back-fill to the crates. This can be done using sand or pea shingle, which needs at least six inches to be placed around the sides and on the top of your crates.
Step 6 – Replace any ground that was removed
The last step is to replace any ground and turf that was removed or any other relevant surface topping. After this the job is done.
Video instructions
If you want to watch how exactly a soakaway crate system is being installed, check out the video below:
Which crates should i chose?
Companies like EasyMerchant keep several different brands in stock for different purposes and uses. All are different sizes and load ratings, so depending on where they are to be installed and what traffic will be passing on top of them will depend on which crates you’ll need.
If you’re dealing with a reputable supplier you should be able to speak to them for advice on which size/load rating will offer the best solution.
While choosing the right crates for installation is very important, you will reduce the longevity and effectiveness of your soakaway system if it is not covered in the right non-woven geotextile membrane. Your membrane should be non-woven and atleast 100gsm in thickness.
Additionally, you might need 110mm sewer or land drainage pipe to fix into the soakaway crates, as well as some waterproof tape for holding the membrane in place.
Conclusion
Even though this guide covers the basics of installing soakaway crates, please make sure to speak with your local authority before starting your installation to check that there aren’t any regional laws in place that you should be aware of.
A percolation test should always be performed before any installation to check that the ground type is suitable.
Installing soakaway crates is not a complex task, but installing them correctly will save any serious issues from arising after the installation.


